Hidy Ho stampers,
So have you seen the new Occasions Mini Catalog? I just love the Mini Catalog program. I was so ready to be over the Holidays and all the trimmings and now I'm onto beautiful cards and snowmen! :0) I love my snowmen.
So here is another tip I have for you…it has to do with the new Edgelits Adorning Accents Dies. These very thin and very fragile metal dies are the exact same width as our Standard Cutting Pads which makes it a little tricky when running them through the Big Shot. BUT NOT TO WORRY…I have the solution for you.
Here is what the die looks like – the very thin silver piece. The die is #125595 and can be found on page 7 of the Occasions Mini Catalog.
If you lay these on your cutting pads, they are very likely to move so I'm going to suggest this tip. Purchase two extra sets of the Standard Cutting Pads #113475 that will be dedicated to ONLY these two dies. It is going to save you LOTS of time and and you won't get frustrated with them but even more important, you won't end up BENDING them.
1. Take one of the dies and put a row of sticky strip on the "flat" side of the die. Line it up and stick it to the bottom of one of the new cutting pads. It is now permanently adhered to this pad. The side with the "edge" or cutter is now sticking up. That one is done.
2. Do the same thing to this one. Now you've used two of your cutting pads. These are permanently adhered to these two pads.
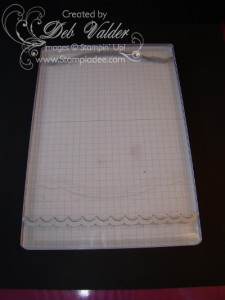
3. This is pad # 3. What you are going to do with this one is add a piece of our grid paper to the back. I cut a piece of grid paper the size of the clear pad (make sure you have it EVEN on both sides – meaning the lines are the same on one side as the other). This is going to be used as a guide for your cardstock. THEN, what I did so the paper didn't get worn, I cut a piece of our Window Sheets (these can be found on page 216 of the big catalog) I cut these the same size as the clear pad also and put that over the grid paper to preserve it. Both of these were put on the back of the pad with Sticky Strip. Now you have three pads that are dedicated to these dies. Read on to learn how to use them…
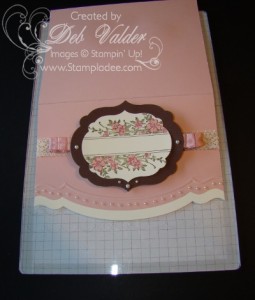
4. In this picture, I'm placing the card on the "grid pad" with the grid on the bottom of the pad and the clear plastic on the top. Do you see that the card is even on both sides. That is very important. If you don't make it even on both sides, the curves on the left will not match the curves on the right. I did put a little dotto on the back of the card to hold it in place while I cut. Then I used my Adhesive Remover to get that little bit of sticky off the card when I was done. Okay, we've got our dies all glued on, we got our grid pad all set and our paper is glued to the top of the grid pad. Now what?
5. For your layers, you are going to put your Multi Purpose Platform down (close the whole thing so that tab 2 is on top), then your pad that has the grid sheet (with the plastic side up and the grid on the bottom), then you line up your cardstock (here I used Blushing Bride), then you put your cutting pad on where you want it. That's one of the beauties for this set up, you can place that cutting edge anywhere on the paper. I've placed it pretty far up on this one but it can be right along the bottom edge – it's totally up to you. It's that easy. Run it through the Big Shot.
6. Now to store the pads and dies. This is another amazing feature. Put the two pads with the dies on them together so that the dies are on opposite ends. Then put the grid pad on the bottom. Take two rubber bands and put one on the top and one on the bottom and store with your other dies. AND, you now have the empty plastic envelope that the dies came in so you can store the three coordinating Adorning Accents Textured Impressions Embossing Folders in. I love it when things work out!
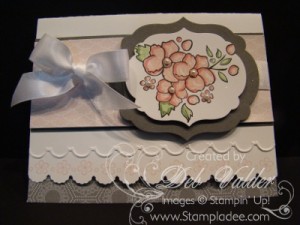
Isn't this card just beautiful? Do you see the scallop on the bottom? That is one of two dies you get when you purchase this amazing new die for the Big Shot and it was so easy with the "permanent mounted dies". If you have ANY questions, just post to my blog. I'd love to have you leave me a comment and get a discussion going on these amazing new products.
Now for my Special. If you place a $75 on-line order from my website during the month of January, I will give you this online class free. Remember if you wait until January 24th, you will also get to pick a free Sale-a-Bration set free. It will have all the directions and measurements for five of these cards (and if you think these two are pretty, wait until you see the other three). These are only two of the cards included in this very elegant class. If you would rather I put the order in, just email me and I will put it in for you.
Thank you for stopping by.


Love this idea and plan to try it! Thanks
I am not a consultant, but I do have a question. I do not own the Big Shot but I have a Cuttlebug. My question is: will these dies work in the Cuttlebug, if so, will the same tip work?
Thanks,
Estelle
Hi Estelle,
I really can’t answer that question, I’ve never even seen a cuttlebug. I wish I could help. If you would ever consider purchasing the Big Shot or any of our dies,contact me, it’s one of my biggest selling items and if you buy it on or after the 24th of this month, you will earn more free product.
Thank you for stopping by my bloG. Deb
Deb – that's fantastic! I really, really love this idea and thinks it's well worth investing in the extra cutting pads. Thanks for the clear instructions & photos.
Thanks for sharing the informative advice. I'll have to try this when I get some new clear plates. Beautiful card, hope you will share the others.
WOW!! Thank you for this great tip….I will be ordering some more of the cutting pads!!
Both these cards are Gorgeous !!! TFS !
HUGS,JANIE
I just love how easy it is! It totally is worth the investment of the two sets of pads!!!
You are so welcome! Glad you liked it.
I will definitely be sharing more…I can’t stop playing with the new Stampin’ Up! dies! They are the best ever!!!!
You won’t be sorry!!!! It’s awesome!!!
Thank you so much! I love playing with these.
WONDERFUL trick!!
Thanks for the great idea as I have been struggling with lining up the edgelites. Do the pads with the edgelits warp with use, like the other cutting pads with use? Actually, I suppose it's the one with the grid paper that might warp? Just trying to figure out the long term effects. Also, instead of grid paper, I've discovered that the Clear-Mount Perfectly Placed Guides (pg. 205) will cling nicely to the back of the bottom cutting plate. Using the cling ons, I'll be able to change out the bottom plate when it gets warped. The largest grid isn't as large as a cutting plate but I think it will be sufficient to line up the c.s. straight. As you can see, I'm still at the experimental stage with these rascals! What do you think? Jan
Another way of keeping the edgelits in place is to stick a post it note over the template and cardstock and run it thru the big shot.
Thank you Wendy for another great suggestion on using the new edgelits! Aren’t they awesome?!
Deb…this is the absolute best tutorial I've seen so far for these edgelits!!! I so appreciate that you took the time to explain it in detail!!! I am totally going to use this tip. Thank you bunches!!
On another note: are you a member of the Yahoo Group-SU! Late Night Stampers? Sherrill Graff is the leader. It's a group just for SU! Demos. I would love to share a link to your tutorial with this group if it's ok with you. There has been a lot of discussion about this topic and I think this would help a lot of others. Also, if you'd like to join the group, it's free, and there are so many very talented ladies that share everything they do. Let me know and I can send you the link to the group.
Thanks again!!
Wow, Deb…aren't you just the most clever girl ever? What a great idea and thanks so much for the detailed instructions complete with photos….I am a visual learner so that was very helpful! Love the grid paper idea as well as the idea of just sticking the edgelets onto the cutting pad with sticky strip….pure genius! Thanks for sharing!
Jan Hoyt
GENIUS!! Thank you for sharing your tip with all of us.
Great advice…thanks so much for saving me time and CS! 🙂
{SMILES}
Debbie,
You are a genius! But I already knew that…thanks so much for sharing this awesome tip!
Alison, Thank you so much! Hope it works as well for you as it has for me! No worries about them slipping or bending! Have a great day.
Deb – Tried this and my scallop edgelit actually bent at the ends and the edge is not straight. Was wondering if you have had any trouble with that?
I trimmed the scallop edge with my craft and rubber scissors. I hope this helps.
Hi Deb, I LOVE this idea, but I have a couple of questions: I'm assuming that the top plate will be turned over so the cutting edge is down on top of the cs. It will now cut into the "grid plate" and that plate will eventually have to be replaced, right? Also, could you adhere multiple edgelits to the plates? I'll bet, as popular as they have been, that SU will produce more. I'm just wondering how cost effective it would be with so many plates? I'm kind of thinking ahead. 🙂 Thank you for such a great idea and for sharing.
Hi Diane,
Sorry for the delay in responding but it’s been busy busy busy during our Sale-a-Bration so my blog has been a little neglected. I only adhere one edgelit to the plate at a time but what you spend on plates, you are going to save on cardstock…the edgelits tend to move some of the time so you have to recut cardstock. I just LOVE the way these are working for my clubs, classes and continuing education. The stampers come right in and just cut without having to adjust; readjust and then readjust again!!!! They love it!!! I hope this helps, it has for me.
o you know at this point if the Cuttlebug will take on Framelits? I am looking at their very new catalogs – Floral Frames Framelits, 5 layering dies, largest 5-1-4 inch wide and is #127012. Has any more feedback come through. I have extended plates for length, but still question the width?? Thank you, Tyna – on page 191 of the new Stampin Up catalog. It shows some basic "how to build a framelits sandwich, but I am still confused as to whether I can use the Cuttlebug. This company sells the BigShot, so no information about a Cuttlebug. I called S.U and they did not know this information as of yet.
Hi Tyna, I do not own a cuttlebug but from those that I have talked to that do own it, some of our dies do work in it. Let me know if I can help in any other way! deb
What a fabulous idea. Thanks so much for sharing it.
Thank you so much Ramoa! Thank you for looking! Have a super day.
Great tutorial…wondering if I still would need to do this now that SU has a magnetic platform? Your thoughts?
Hi Paulette, You probably wouldn’t need these with the magnetic plate. I love the magnetic plate! What a wonderful invention.