H Slider Card
idy Ho Stampers,
I’m sorry for the delay, I had trouble getting this posted. BUT I’m here now! I know you’ve all been asking for the measurements. So let’s get right to it for the Slider Card.
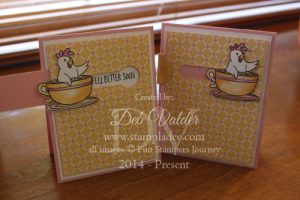
On the right it’s “closed” and on the left it’s “open”
see how it slides out – calling this a Slider Card?! SOOOOOO cool
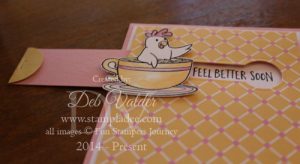
You can see it a little bit better here.
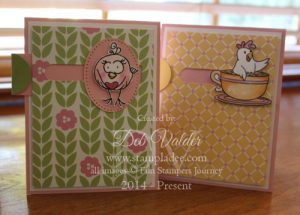
Here is one using Pretty Birds

You need to watch the video to see the hidden message on this slider card.
So how did I do this? Check out my video. If you are viewing this from your email, CLICK HERE to see it. Enjoy
So what did you think? Wasn’t that so easy?
October Specials –
- Join my Team this month for ONLY $99 and you will receive the NEW Amaze die cutting machine. It comes with all the pads and the magnetic platform, these are included with the machine – they are not add-0ns! You also get SEVEN dies with the machine and all the kit supplies – INLCUDED with the $99 kit. CLICK HERE to get a copy of exactly what is in the kit.

2. Our Amazing Memories Special – Do you like to scrapbook? Make sure you check this out. Click here for the details.

3. And something that is near and dear to my heart – it’s October’s Breast Cancer Awareness month. CLICK HERE to learn how you can help with your cardmaking crafting skills.
Here are the measurements for today’s slider card:
Card base is 11 x 4 1/4″ and scored at 5 1/2; next layer is 5 1/4″ x 4″; the top designer paper layer is 3 3/4″ x 5″ and the “pull tab” is 3 3/4″ x 1 1/4″ (then use the coordinating punch for the circle – which is the 1 1/4″ circle punch). Definitely invest in the Tab Clips Die #DI-0240.
Supplies:
Stamp Sets: SS-0331 Get Well (so stinken cute); AT-0215 Pretty Birds
Card Stock: CS-0099 Bubble Gum; CS-0040 Whip Cream; CS-0026 Pineapple Smoothie; PP-0028 Confectionary Prints (designer paper)
Ink: IP-0041 Black Licorice
Accessories: DI-0240 Tab Clips (a must to add to your collection); NEW TO-0134 Amaze Die Cutting Machine; TO-0014 1 1/4″ circle punch; TO-0031 Punch Handle (you only need one of these and you have it for ALL our punches); TO-0118 Journey Days Stapler (TO-0119 Gold Staples or TO-0120 Brushed Silver Staples); AD-0085 Medium Journey Foam Squares; IP-0088 Fusion Blender; then whatever re-inker colors you want to use to color your piece.
Directions:
- Using the Tab Clips die, cut out the slider about 1/3 of the way down the designer paper layer (the 3 3/4″ x 5″ layer).
- Center and layer underneath the designer paper the Whip Cream layer (do not attach it yet) – just stamp the sentiment in the opening all the way to the right.
- Lay the 1 1/4″ x 3 3/4″ strip down on the backside of the designer paper (covering up the hole we just cut out) and start laying your foam squares to line both sides of the strip (make sure they are not too close or too far away from the strip).
- At this point, take out the strip and turn over the cut out layer so you are looking at the front of the designer paper (the cutout should be on top – 1/3 of the way down).
- Adhere the the designer paper to the Whip Cream layer (the foam squares will be our adhesive)
- Put the slider piece back into the little tunnel you created with the foam squares leaving a little hanging out on the left side and pushing it in JUST until you meet the end of the right side (so slide it in until you can’t see any of the white layer below).
- Add one of our Medium Journey Foam Squares on the right side as a stopper.
- Punch out a 1 1/4″ circle and fold in half. Put adhesive on ONE HALF of the inside circle and attach it to the slider. Then take the Journey Stapler (it’s so much smaller than a regular stapler) and staple the circle to the slider. Now rough up the top piece where the stapler is so the upper part is lifted from the slider (see video for this, the picture explains it so much better).
- Slide your slider all the way in until is stops and add your stamped piece to that.
- Add it to your card base and WAH LAH you are done! Easy Peasy!
Thank you so much for stopping by my blog today, make sure you follow me on Facebook, Pinterest, SplitCoastStampers, YouTube and whatever else is out there! :0) I enjoy teaching this craft so much! Have a great day.
Leave a Reply