Hidy Ho Stampers,
Whew…been busy unboxing, sorting, labeling and distributing catalogs to my club members. I will be giving out the rest on Monday (I have Stamp Camp on Saturday, so I won't be home to give them out until Monday). So this is what it looked like when they were delivered…


Mr. UPS man delivered and delivered and delivered!
My mudroom is overflowing!
I'm working as fast as I can!!! :0)
Now for today's card. This is another version of the BLOCK card. I love it.

Stylin Girl stamp set colored with Blendabilities

Inside of card, see the blocks?

Top view looking at the open blocks.

The one on the left is colored with Blendabilities,
the one on the right is colored with markers.
A few more samples…


DIRECTIONS FOR BLOCK CARD:
1. Cut a piece of card stock at 5 1/2" x 10 1/2"
2. With the 10 1/2" side up on the trimmer, score at 3 1/2" and 7"
3. The first fold will be a mountain fold and the second fold will be a valley fold.
4. Close the valley fold and line it up at the top of the trimmer you will be cutting down 1 1/2" along the fold at:
3/8", 1 3/8", 1 5/8", 2 5/8", 2 7/8", 3 7/8", 4 1/8", 5 1/8"
5. Turn 90 degrees and score at the end of the cuts (at on the 1" slits) so they can fold up with the mountain folds. Leave the 1/4" slits as valley folds.
6. Front of card:
a. Cut a piece of Basic Black cardstock at 3 3/8" x 5 3/8" and adhere that to the front of the card
b. Cut a piece of Designer Series Paper at 3 1/4" x 5 1/4" and adhere that to the top of the card.
c. Cut a black and an Island Indigo oval (from our Ovals Collection Framelits). Run the Island Indigo oval through the Chevron Embossing Folder. Adhere the two ovals to the card front.
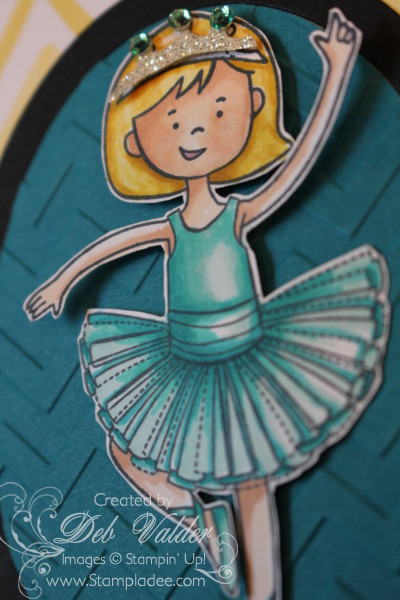
d. Stamp the Ballerina with Memento Ink and color her in with our NEW BLENDABILITIES
e. Tie a fork bow (see my video on YouTube for fork bows) and add it to the bottom of the ovals.
f. Color 3 Rhinestones with the BLENDABILITIES and add them to the tiara! Pop her onto the card front.
7. The inside panels:
a. Cut two pieces of Designer Series Paper 1 7/8" x 5 3/8". Adhere those to the two panels.
8. The building blocks:
a. cut seven pieces of Whisper White card stock at 7/8" x 1 3/8". Stamp your message on these pieces and adhere them to the blocks on your card. Or you can make a mat that extends from one side to the other – 1" x 2 7/8"
I want to thank you for taking time out of your busy day to look at my blog post. Thank you. Please let me know if you have any questions.
I am so happy I met you, you inspire me. I love your work and you are so easy to follow. I will try this one, I have been having fun with the first block card I tried a baby one. I have been bragging about you and telling my friends to check out your work via U tube.
Oh Maryanne, thank you so much for your sweet comment. You have made my day! Thank you from the bottom of my heart. If you ever have any questions, please let me know. Deb http://www.stampladee.stampinup.net
I love this! I had to try one right away! I put it on Splitcoast with a link back to you. Thank you so much, this was fun to make!!
Both of the girly cards area wonderful – but thinking I like your UPS delivery guy card the best!!!!! This is one of those days that you make me giggle and sigh at the same time….love it!
I LOVE the A-Dor-able UPS delivery man card. How creative!
Oh Kris, I’m so excited you tried it! Wasn’t it easy?!!! Thank you for the link back to my site! I so appreciate it. Let me know if you have any questions. deb http://www.stampladee.stampinup.net
Hi Carol, ha ha ha…you are making me laugh! The UPS guy was fun and he’s so cute! glad I could make you giggle. Love hearing from you. deb http://www.stampladee.stampinup.net
Oh Dana, than you so much. He’s so much fun to make. Let me know if you have any questions. deb http://www.stampladee.stampinup.net
I just tried this card. Absolutely LOVE it. I made mine a Graduation Card. It turned out adorable. I hope the recipient appreciates what she’s receiving. THANK YOU so much for sharing!!
You are so welcome Patricia. Thank you for stopping by and thank you from the bottom of my heart for leaving me a comment. It makes it all worth the effort! I love to share with everyone. If you have any questions, plese let me know. deb http://www.stampladee.stampinup.net
Hi Debbie how did u cut the ballerina out and wht did u use 4 the happy bday letters ? Thks
Hi Monique, I “fussy cut” meaning I cut it out by hand and the letters that I used are called Sketch Alphabet #130565 and will be gone after today. HURRY get them today or you won’t be able to. http://www.stampladee.stampinup.net deb
Can you tell me what stamp you used for the damask pattern on the Valentine card? I LOVE it, and am having a hard time finding one I like as much as yours!
Hi Hillary, It’s a retired stamp. Let me see if I have it. If I do I can just send it to you. If you have any questions, let me know. deb http://www.funstampersjourney.com/debvalder for all your shopping needs.